Flutter is Google’s UI library that was initially launched to develop native, performant, and beautiful mobile applications. However, the vision behind Flutter isn’t restricted to just mobile apps, it’s to build user interfaces for any and every screen with cross platform development.
If you go to flutter.dev, you will see the following:

Flutter is actively working towards extending the same codebase towards anything with a screen: Android, iOS, Web, and Desktop seamlessly.
With some extra effort — you can essentially use the same codebase to create apps for responsive web (competing with SPA frameworks such as React, Angular, and Vue) and for the Desktop (competing with Electron and Qt) and hopefully embedded devices and more in future.
Developing multiple applications using Flutter (called targets in Flutter) from a single codebase isn’t a simple feat. React Native too promised the world with it’s “Write Once, Run Anywhere” tagline but as developers would attest, this is far from reality.
FYI: Flutter for Web is still in Beta, though merged into the main Flutter codebase.
How is Flutter for Web different?
To understand Flutter web development, first, you need to understand how Flutter works for Mobile Apps and how it is unique. Mobile apps are a visual interface that interacts with a backend via APIs, similarly, Flutter Web and Flutter Desktop are applications that communicate with a backend via APIs (thus server-side rendering with Flutter isn’t possible).
Flutter (Mobile) uses its own rendering engine called Skia — this gives the Software Development Kit (SDK) complete control over every pixel of the screen and it does this with accuracy and performance.
Furthermore, Flutter has its own widgets (which you can find on pub.dev) built completely with Dart — enabling the framework to deliver high performing native apps.
The rendering engine, Skia, that Flutter uses for mobile was built originally for Chrome.
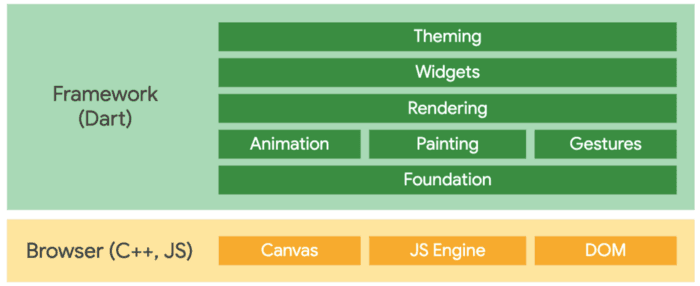
Flutter web does something similar. It uses the entire screen as a canvas and creates its own HTML elements thus giving it complete control over every pixel. This is rendered with standard-based web technologies i.e. HTML/CSS and Javascript. Thus, you can actually use all of the features of Flutter including animations, routing, etc without the need for separate source code.
Flutter web has two different rendering engines that developers can choose from, namely:
- DomCanvas
- CanvasKit
DomCavas is essentially an HTML DOM-based model that combines HTML/CSS/JS and the Canvas API to build, layout, and paint Flutter widgets on the web. Flutter for Web, which started with this strategy, as of now uses DomCanvas by default.
CanvasKit, by Skia, in contrast, uses WebAssembly and WebGL, which enables the browser to take advantage of hardware acceleration. This improves the ability to render complex and intensive graphics efficiently. CanvasKit is still being worked on, so be wary of using it in production.
While CanvasKit seems to be the right place to go, there is one major drawback — its initial payload which can go upwards of 8MB before the user can even see the application. Unless users are aware of this beforehand — most won’t stick around to wait for the app to load.
How is the performance of Flutter for Web?
At the beginning of 2019, Flutter for Web was originally in a separate repo of its own. This repo merged into the official flutter branch on Sept 10, 2019, with the launch of Flutter v1.9. The Flutter developer community is very active and is making rapid progress to boost performance and bring the Flutter Web to a stable release. In my opinion, while the current version isn’t production-ready yet — I’m hopeful it will happen very soon.
Flutter web performance is measured by primarily two things. The first is the ability to render and manipulate large amounts of data and the second is transitions, effects, and animations.
Dart is able to handle long lists flawlessly and I was able to scroll through 100k records in a breeze. In general, Flutter for Web satisfies the former requirement but pales in comparison to modern JS frameworks in the latter.
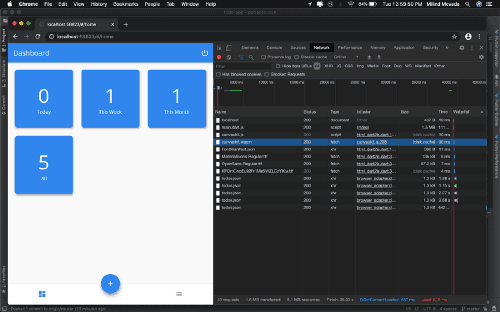
As mentioned earlier, there are two rendering engines that developers are free to choose from. Testing with our Flutter project, To-Do application — we found the following:
- When built with DomCanvas, the app had a total payload of 1.8MB, out of which main.dart.js was the major contributor of 1.6 MB
- When built with Canvaskit, the app had an initial total payload of 8.1MB! a whopping 450% more than the default. The main.dart.js actually shrank a little to 1.5MB but the new web assembly file, canvaskit.wasm called from canvaskit.js took up more than 6MB of space.
This additional bulk size for Canvaskit enhances its performance by leaps and bounds. Now, it’s up to you to decide if your users will wait for the additional time to get better user experience.
All in All, in terms of web performance — Flutter has a long way to go to match up to modern JS libraries and frameworks such as ReactJS, Angular, and Vue; but it can prove beneficial in many scenarios.
How to Run Your Current Project on Flutter Web?
Flutter Web is compatible with version 2.0 of Flutter at the moment, but if you have a previous version installed, then you can still use it on your machine by running the commands mentioned below:
$ flutter channel stable
$ flutter upgrade
$ flutter config --enable-web
$ flutter create .
If you are using Flutter 2.0 and want to reuse it across the web, run the command below:
$ flutter config --enable-web
$ Flutter create .
You can run your project using Flutter Web (web folder in the project directory). To run this project on the web, choose Edge or Chrome and click Run.
What to Consider While Using Flutter for Web?
Here are some key things to consider before using Flutter Web.
- You can only create single-page applications with Flutter Web.
- A web developer can change the native code for both iOS and Android.
- It's important to make your Flutter web app responsive, so that it opens on any screen size.
- When deploying your Flutter web app, first-run Flutter builds web. Doing so will incorporate all applicable assets required to create a standalone web archive that a static web server can host. This archive will contain the native codes in a web folder located inside the project directory.
- Be sure to double-check the supported platforms before you start to code.
Tools support for Flutter web development
Once the environment setup is done, you will need an IDE to start developing for the web. Follow this step-by-step guide to install your favorite IDE:
Visual Studio Code
With the release of the Flutter 3.0 extension, Visual Studio Code now supports Flutter web development.
- Install the Flutter SDK
- Set up Visual Studio Code
- Configure Visual Studio Code to point to your local Flutter SDK.
- Run the Flutter: New Web Project command from VS Code.
- After you create the project, press F5 or "Debug -> Start Debugging" to run your app.
- VS Code will use the webdev command-line tool to build and run your app; a new Chrome window should open, showing your running app.
Using from IntelliJ
- Install the Flutter SDK
- Set up your copy of IntelliJ or Android Studio
- Configure IntelliJ or Android Studio to point to your local Flutter SDK
- Create a new Dart project; note for a Flutter for a web app. You must start with the Dart project wizard, not the Flutter project wizard.
- Select the 'Flutter for web' option from the Dart project wizard for the application template.
- Create a project. PubGet will run automatically.
- Once you create the project, hit the "run" button on the main toolbar.
- IntelliJ will use the webdev command-line tool to build and run your app. A new Chrome window will show your app running.
Using Android Studio
Android Studio has no direct plug-in or template to create a web project. Instead, you can use the Stagehand package, a dart project generator, to get your web projects set up and ready. Here's how you set up Stagehand:
- Install the Flutter SDK
- Set up your copy of Android Studio
- Configure Android Studio to point to your local Flutter SDK
- Run the following command from your terminal $ pub global activate Stagehand.
- Once you install Stagehand, use it to generate a project skeleton in the desired directory.
Unique Arsenal: Adaptive Design
Flutter for Web has a trick up its sleeve that most JS frameworks can’t replicate easily. It is the ability to deliver customized versions for the Web depending on the underlying OS (operating system) — just like it does for Android and iOS.
We tried out our to-do app as a Flutter web app example on a Mac and a Windows machine and depending on the underlying OS, it served up different variants of the same.
Take flutter web app example of a small case below, you will see a different back button and alignment for the header text on a MacOS v/s Windows.
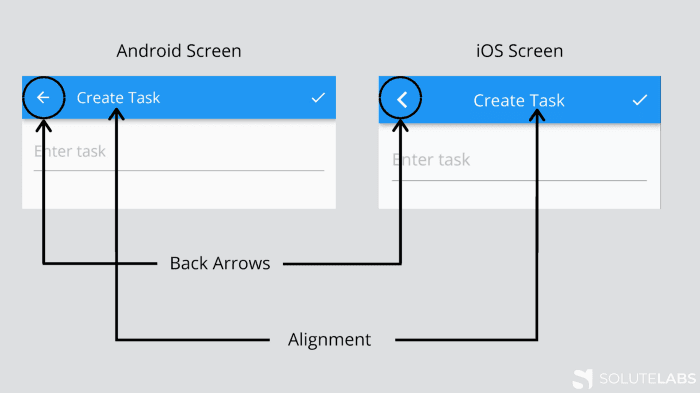
You could however use the same design across both if you would like to enforce consistency by defining app-level traits on these widgets — but I feel that this could really improve the experience of the user in many ways. Furthermore, there are no payload size savings if you choose to go with a specific style only such as a Material design.
You may wonder as to how this is possible! In reality, the dart components which are adaptive don’t require any extra effort at all. Just like how Flutter adapts to the mobile devices, it adapts to the web as well.
You can read about the general platform-specific adaptations here:
The above-mentioned adaptations are specific to mobile devices and are automatically enforced by Flutter. In case you want to enforce a particular Style on all three platforms, you will just need to use a different Widget. For example, when you might want to use a Switch component ( i.e. to enable/disable feature):
- Use MaterialSwitch, and it will render the switch in material style on any platform
- If you want it to be adaptive, use Switch.adaptive
Hence, adaptations on Flutter for Web can happen in three ways:
- Adapting automatically based on the Flutter widgets used
- Using one variant across all platforms (like the switch example above)
- Use app-level trails to define a variant for a specific target
My recommendation is to always go with the first — gives the best user experience and has the least effort involved out of the three.
How do you create responsive layouts for Flutter for Web?
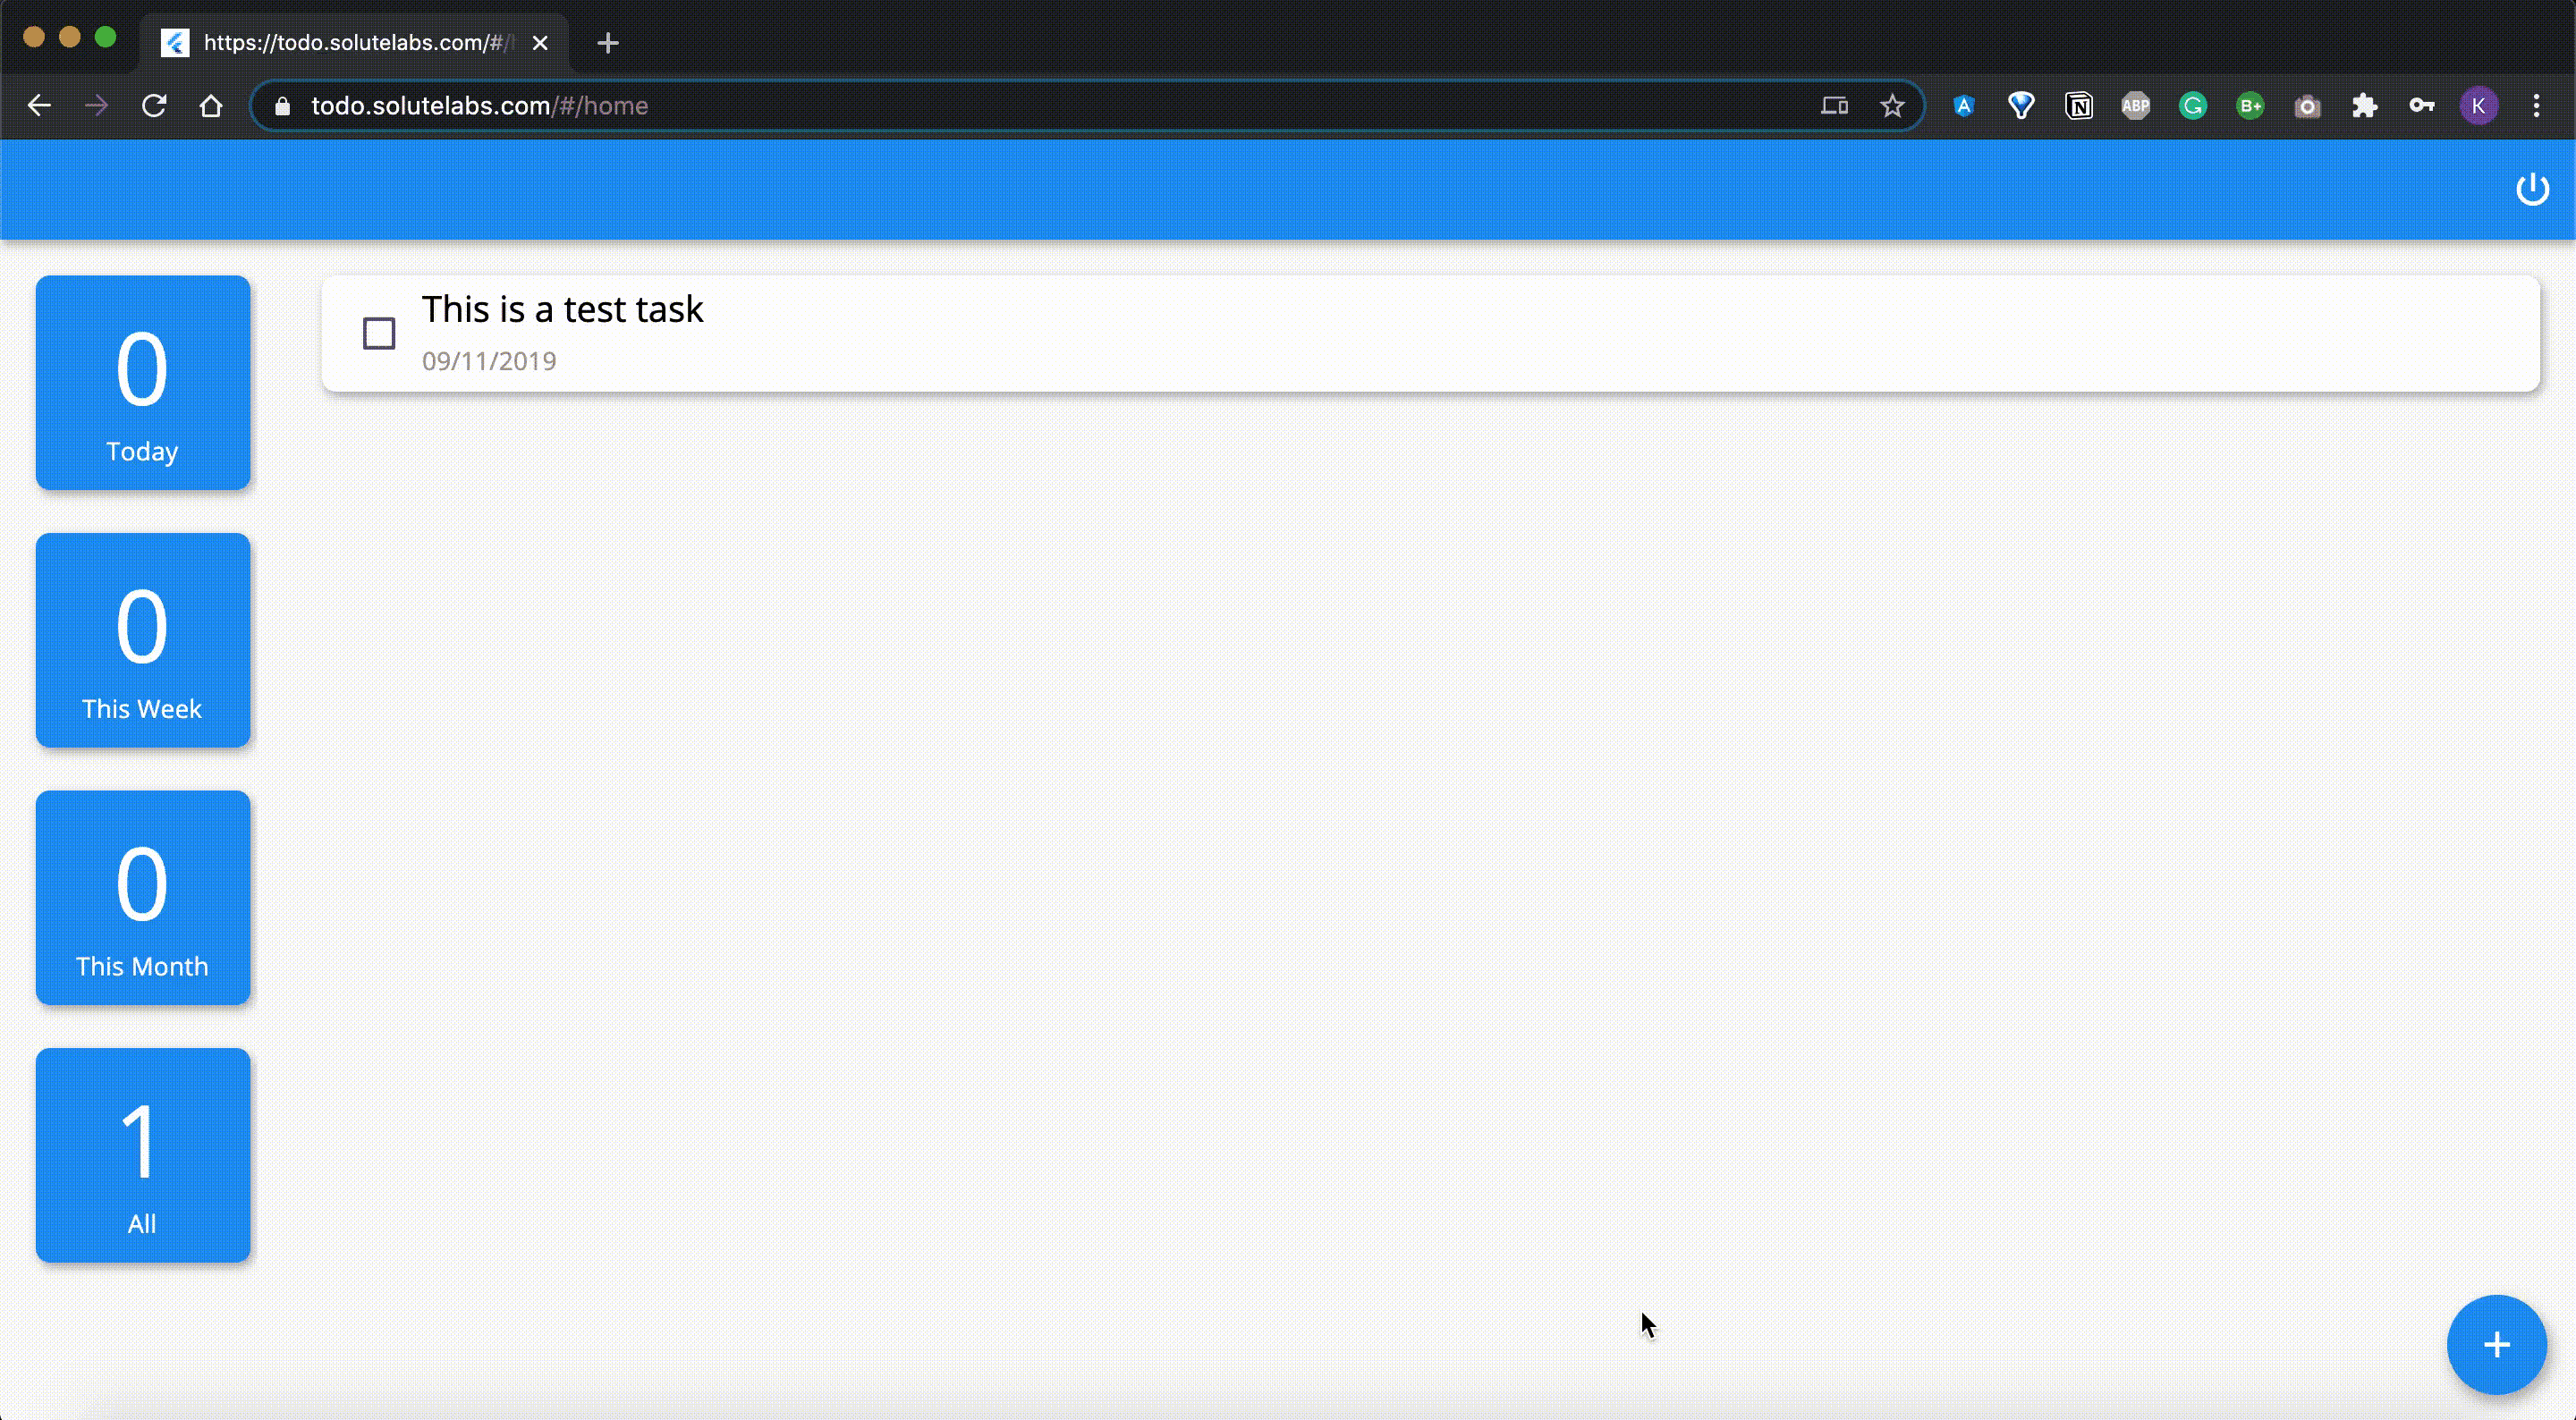
We have seen the power of Adaptive Designs on Flutter, it’s time to understand as to how to create responsive designs on Flutter Web.
While creating a responsive UI, we need to first identify and understand a few product requirements such as:
- Do we have a different design for Web & Mobile?
- Do we have a common design across web & mobile that scales visually?
- At what sizes does the design scale?
- Do we have a similar design but need a few components that switch between different sizes?
One would ideally have similar designs (I say similar because things like calendar, back buttons, scroll, etc should be adaptive as explained before) across Mobile and Web but since the web real estate is much larger, one should ideally take advantage of the same.
Flutter provides many widgets that help us with layouts & resizing widgets with respect to device size. When we want a common design that accommodates properly within the available size, such widgets help us do that.
Let’s explore some of them:
MediaQuery
MediaQuery helps us identify device size, orientation, edge paddings (In case of devices with Notch), and other useful information when you run Flutter during runtime.
Using this information we can make certain decisions regarding widgets layouts.
e.g.
- GirdView column numbers.
- Switch the component based on available width, like the Header menu in web view that converts into an overflow menu when it cannot accommodate in available width.
- Master/details flow based on device orientation
LayoutBuilder
While MediaQuery helps with detecting the overall device size, LayoutBuilder helps us to identify how much space the child widgets will have. It gives BoxConstraints that have information on available minimum and maximum sizes.
There are quite a few more widgets available that also help with other through processes like Aspect ratio based, relative sizing, constrained sizes.
- AspectRatio
- CustomSingleChildLayout
- CustomMultiChildLayout
- FittedBox
- FractionallySizedBox
- OrientationBuilder
If we want a custom design for Mobile & web or for even granular sizes. We have multiple approaches available to achieve.
If we want to support two layouts, the most simple way would be to define App Level traits
enum UITrait { compact, regular }
mixin UITraitsMixin {
UITrait deriveWidthTrait(BuildContext context) {
final width = MediaQuery.of(context).size.width;
if (width <= 600) {
return UITrait.compact;
} else {
return UITrait.regular;
}
}
}
Later while creating any widget, we check the current value of UITrait & render the widget accordingly. Upon resizing the screen widget will be rebuilt & we should be able to see the layout changes.
We can check the live demo here:
And the code for the same here:
Now, within a particular UI; let’s say for a web to support different sizes, we can use a mix & match approach with inbuilt widgets to achieve a more responsive design.
If we want more granular control (rather two designs Web & Mobile), Material has standard guidelines across technologies to create responsive UI, which is called Material breakpoint.
It basically creates more screen breakpoints & helps us to justify UI to satisfy each of those breakpoints.
In order to achieve this in Flutter, there is a package available responsive_framework | Flutter Package.
It has an AutoScale feature, that shrinks and expands your layout proportionally, preserving the exact look of your UI. This eliminates the need to manually adapt layouts to mobile, tablet, and desktop.
It allows both Scaling & Resizing of widgets. Flutter, by default, supports resizing with screen size changes as we saw in the above GIF. The primary difference between them would be as below
- Resizing — the AppBar’s width is double.infinity so it stretches to fill the available width. The Toolbar height is fixed and stays 56dp.
- Scaling — the AppBar’s width stretches to fill the available width. The height scales proportionally using an aspect ratio automatically calculated from the nearest ResponsiveBreakpoint. As the width increases, the height increases proportionally.
The package also allows configuration to which breakpoint it should scale & when it should resize.
There are a couple of ways responsive design works. One approach could be to have different designs for different device types, that may use common or different flutter web components based on the device — or there could be the common design that scales on proportionally on the different sized devices.
Although, as we saw earlier, Flutter provides in-built widgets to deal with such problems. We can control how Widgets should size them as children & also how they should have layouts. We also saw an example of responsive design as well as implementation. Later we saw a package that helps us simulate such a development process easily & reduce the common problems of responsiveness.
Embedded Interactive Content
One really interesting way to use Flutter for Web is to integrate a whole/parts of an application within an existing web application. It is possible to load the entire web application or even a particular route of the same within an existing application.
This is possible by inserting the entire Flutter app inside an HTML div. The Flutter app obviously would have to be hosted somewhere. Something simple such as the below would work.
<div>
<object type=”text/html” data=”https://todo.solutelabs.com/#/" width=”800px” height=”600px” style=”overflow:auto;border:5px ridge blue”> </object>
</div>
Flutter doesn’t add any `X-Frame-Options` inside the application headers so it works out-of-the-box. Having said that, you can conversely stop the loading of your app inside someone else’s browser by working with the CDN you use. We use Netlify and Codemagic as CDNs for most of our projects, you can set custom headers on Netlify here — a simple google search for setting custom headers in most cases would suffice.
Not having any X-Frame-Options could be bad for your website as it could lead to clickjacking but you could probably make use of the SAMEORIGIN directive as shown here.
While the app I have has only one public page so it’s the one I’ve loaded — one can possibly load any public page that is configured within the router. This can lead to some interesting use cases, such as:
- Add quizzes, challenges, etc into static content such as a blog
- Allowing people to play small games which were created for the Mobile
- Incorporate public dashboards across Web and Mobile seamlessly
Should you consider going to production with Flutter for Web?
While it might be impractical for someone to build an eCommerce store with Flutter Mobile and then port it to Web (at least in the current state), there are still places wherein Flutter could be a good fit, such as:
- You already have a mobile app in a place built entirely in Flutter and want to give your users a web app to operate the same application. Probably a B2B application with lots of data.
- You don’t have a product yet and are expecting most users to use the mobile app. But, at the same time, you want to give the flexibility of using it on a web device to users who won’t abandon your product if they find issues with the web app.
- You want to create interactive pieces of content that are already available on the mobile end and don’t want to spend time developing the same thing on the web (for which SEO isn’t important). For example, a personal finance app’s dashboard could be made available on the Web assuming all the entries are essentially done through the mobile app.
There are almost no known names that have their web applications powered entirely by Flutter for Web. All I could find were some portfolio sites and some small ones such as:
Flutter builds everything into one object — one Android Activity, a single iOS View, or in case of Web — a single HTML element. Because of this, you can’t play around with the HTML/DOM freely. So if you’re looking to add a web developer to your team to add a few scripts or make a few tweaks on top of what Flutter has built — you’re out of luck!
Everything in Flutter for Web has to be made from pure Dart functions or if you’re integrating third-party SDKs, you will have to create your own widget for web also known as Federated Plugins.
Flutter for Web has its share of pros and cons at the moment and I’m hoping that the developer community at Google is working furiously to overcome them. I’ve listed down a list that will help you make that decision.
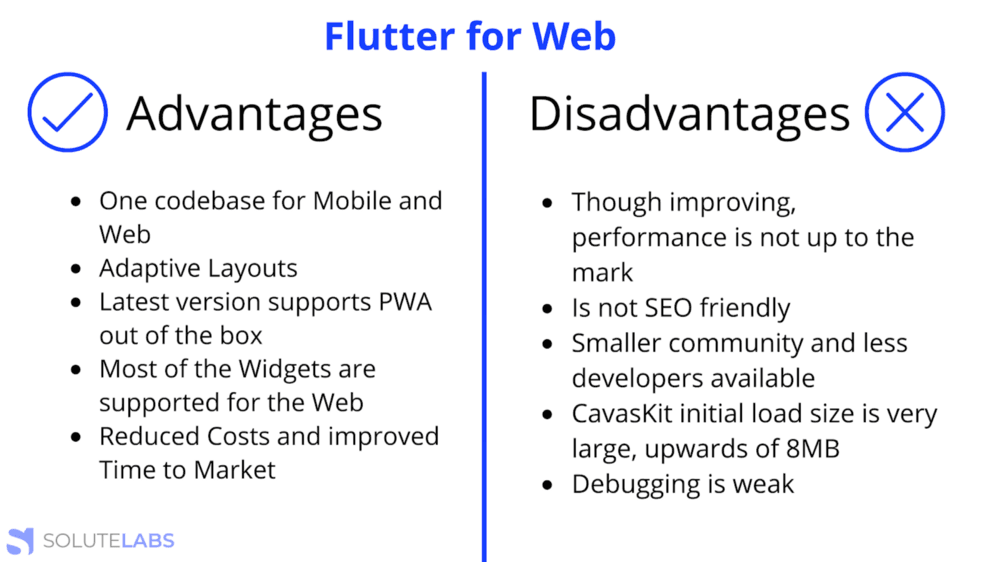
FYI: Looking at these pros and cons of Flutter for Web, if you can’t make a decision for Flutter web development, you can always reach out to us :)


