The world has come a long way since the inception of Android phones in 2003. It has changed the way people communicate and perform daily operations. In fact, with such a steep rise in usage of mobile phones to perform day-to-day activities, almost 50% to 60% of the website traffic comes straight away from mobiles, iPads, and tablets.

According to Statista,
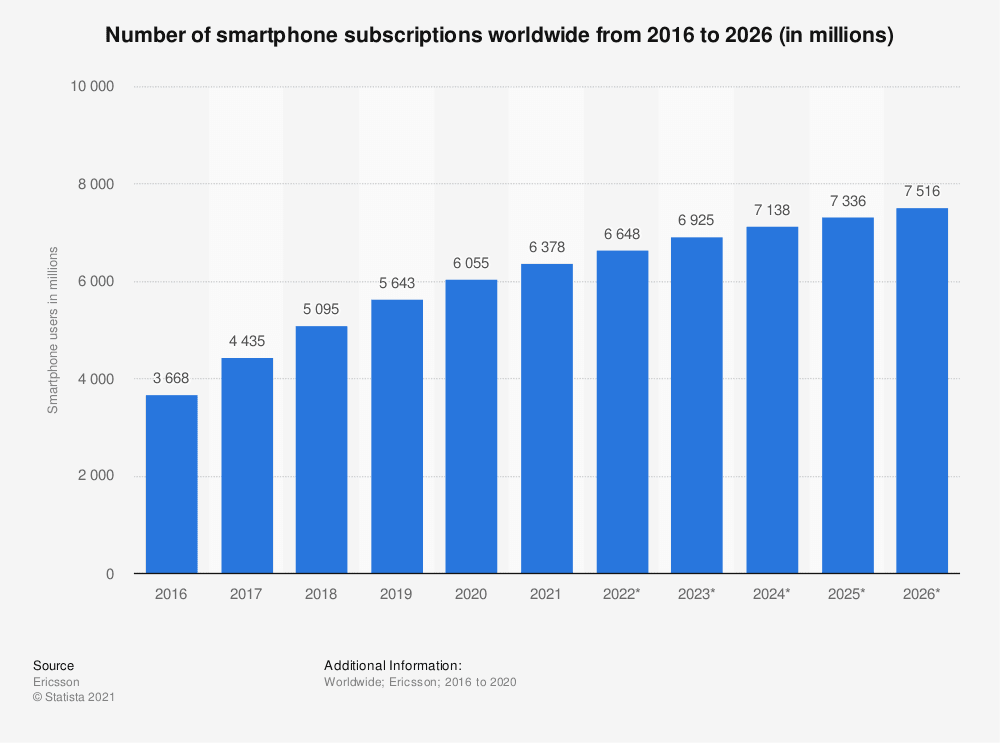
- The number of smartphone subscriptions globally surpassed six billion and it is forecasted to grow further in millions in the upcoming few years.
- India, China, and the USA are the top countries having the highest number of smartphone users.
- Since the smartphone penetration rate is lower than 70% in highly populated countries, it has huge growth potential particularly in countries like India and China.
- Due to the average selling price of smartphones, the global revenue of the smartphone market skyrocketed in the last few years.
- Apple and Samsung are the leading smartphone vendors that account for half of the smartphone shipments worldwide.
It won’t be an exaggeration if a product-based company like Amazon, Flipkart offers a web and native mobile version for major platforms i.e. Android and iOS. Mobile app developers need to work across platforms to make sure that an app or website offers a consistent and flawless user experience. So, whenever a user makes a switch between app and web version, the transition should be seamless.
But, what if even after spending immense time, money, and resources on the design and development of apps, it still doesn't meet the expectations of the users?
In such a case, what can one do?
There should be a way out where the experience of the organization's website matches with the native mobile experience.
YES, there is a way out – PWA aka Progressive Web Applications.
First introduced in 2015 by Google engineer Alex Russell and designer Frances Berriman, it’s not a new concept. Simply put, PWA is a website or application that delivers native-like app performance. It is fast, reliable, and engaging.
Adriana Jara, a Developer Advocate from Women TechMakers explains what PWA is in just a few minutes. She goes over the gap between web or native app creation to help you get the best of both worlds, of course, with PWA.
Cool, what makes an app a PWA?
A good PWA should satisfy the following criteria:
1. The site must be served over HTTPS.
2. All application URLs must load and work in offline mode.
3. All the app pages must be mobile-friendly and responsive.
4. Using Web App Manifest, Metadata for the “Add to Home Screen” option must be provided.
5. Initial app load performance should be faster on slower networks like 2G and 3G.
6. The site must be cross-browser compatible.
7. Each traversable page in the project must have a unique URL shareable across devices.
8. Page transitions should give a native-like experience. The transition should be instant or should be a loading indicator.
9. It should be installable.
10. It should provide push notifications in offline mode too.
Want to build a great Progressive Web App?
How to build PWA with Next JS?
If you want to get started with building Progressive web apps with Next JS, one of the things you’ll surely notice is that the majority of the “Build PWA with Next JS” guides available on the Internet will add innumerable libraries and classes that you don’t need. Adding a ton of unwanted libraries and classes redirects you down the wrong path in terms of code quality and technologies.
At SoluteLabs, our approach to build pwa is based on simple tools and techniques optimized to give you better performance and a high user experience. The small code base will translate faster which results in better maintenance of the products.
One of our favorite tech stacks is Next.JS – An open-source development framework built on top of Node.JS which enables React-based web application functionalities to generate static websites. Its API is simple and easy to use with innumerable documentation and examples handy for rescue.
It performs extremely well and has all the tools and features to make the web faster. And, the best part is that we just need one JS file for the main page to get started. Just one, seriously! Sounds so cool, doesn't it!
Today, we’re going to convert the default Next.JS template into a PWA. You can even create your web app.
So, enough chit-chat now. Let’s get started.
Also, read: 10 Ways to Improve Your Next.JS App Performance
Setting Up Your Environment - Just 5 Minutes!
So, first things first. To keep everything neat and tidy, we need to create a project folder to document everything. Inside that folder, we’ll create a package.json file to document every detail that’s gonna be used in our app.
You can do this by typing the below code:
npm init -yUsing this command, a package.json file will be instantly generated for the project. This file contains all the useful information about the app and development scripts. So, in any case, if the developer leaves the project, other developers can easily pick from where they left off.
Creating A Next App – 10 Minutes
One of the easiest ways to get started with Next.JS is by using the create-next app. This command-line interface tool will help you to quickly start building a new Next.JS application with everything set up for you. You can create a new app by using the default Next.Js template too. Use the following command:
npx create-next-app next-pwa-demoWhy use Create Next App?
create-next-app allows you to build a new Next.js app within seconds. It is managed by the creators of Next.js and includes several benefits like interactive experiences, offline support, Zero dependencies, testing, and support for example.
Since the package is a part of the Next.JS monorepo, it is tested using the same integration suite as Next.JS to ensure better working at each release.
Install The Required Dependencies – 10 Minutes!
Now we need to add one main dependency for the Next.JS: next-pwa. It helps you to precache the resources on the first load and then inject a fallback handler to the handlerDidError plugin for runtime caching. You can make use of both the package managers i.e. npm and yarn.
Below is how you can add dependencies:
npm i next-pwa # npm
yarn add next-pwa # yarn
Create next.config.js File
You can create the configuration file using the below command:
touch next.config.jsTo add our next-pwa configurations, we need to edit this file. Given below is an example that will assist you in getting started building your demo app.
const withPWA = require('next-pwa')

module.exports = withPWA({
    pwa: {
        dest: 'public'
    }
})
If you have noticed, we have added our pwa config inside withPWA. The previous versions of the Next, serving service worker need a customer server. But with Next 9+, it isn’t required. next-pwa will create the sw.js file and this file will serve from the public folder in the production build.
Create manifest.json File
Now it's time to create a manifest.json file inside the public directory. Though you can make use of manifest creator, I’ve created my manifest file so that you can copy the code and make the task simpler.
{
  "name": "Next PWA demo",
  "short_name": "Next PWA",
  "icons": [
    {
      "src": "/icon.png",
      "sizes": "192x192",
      "type": "image/png"
    },
    {
      "src": "/icon-512x512.png",
      "sizes": "512x512",
      "type": "image/png"
    }
  ],
  "theme_color": "#FFFFFF",
  "background_color": "#FFFFFF",
  "start_url": "/",
  "display": "standalone",
  "orientation": "portrait"
}
Create and add Meta Tags
Now it's time to create a set of Meta tags and add it straight away in the pages using the <head> component imported from next/head.
Here’s an example of the Meta tag required.
<meta charset='utf-8' />
<meta http-equiv='X-UA-Compatible' content='IE=edge' />
<meta name='viewport' content='width=device-width,initial-scale=1,minimum-scale=1,maximum-scale=1,user-scalable=no' />
<meta name='description' content='Description' />
<meta name='keywords' content='Keywords' />
<title>Next.js PWA Example</title>

<link rel="manifest" href="/manifest.json" />
<link href='/favicon-16x16.png' rel='icon' type='image/png' sizes='16x16' />
<link href='/favicon-32x32.png' rel='icon' type='image/png' sizes='32x32' />
<link rel="apple-touch-icon" href="/apple-icon.png"></link>
<meta name="theme-color" content="#317EFB"/>
Test your PWA
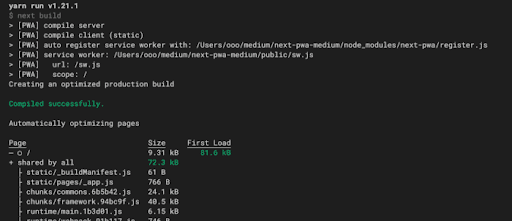
Now your app is PWA ready. You just need to test this. When we use next-pwa, the service workers are enabled only on production. So, we should build our app with npm run build or yarn build. You will see something like this after you’ve built it.

Now start the production local server with npm run start or yarn start.
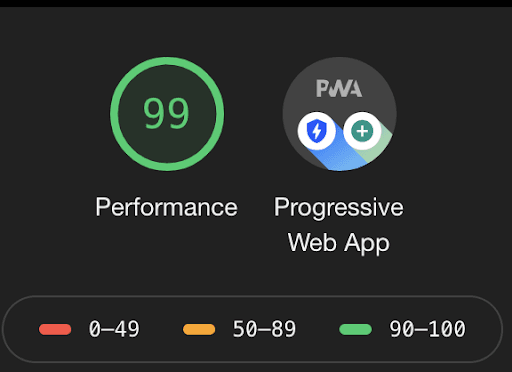
Go to http://localhost:3000. If you are on Google Chrome, run a Lighthouse Audit. You should see something like this:

The one item that is marked red in the report below is:

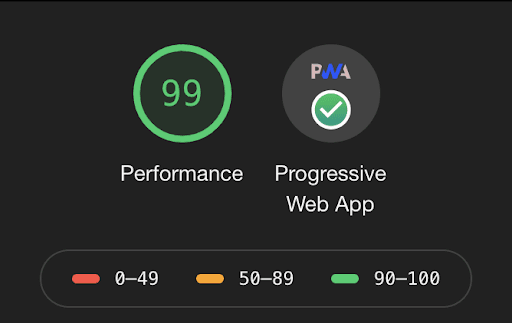
That’s because PWAs need to run on an HTTPS server. So, deploy this to a server and run it via HTTPS and you can get something like this;

Now you can get caching, offline support, and the option of “Add to Home Screen” prompt on chrome. This will enable users to use your nextjs PWA app just like your native Android and iOS application.
So now, finally your PWA app is ready.
Enjoy your Progressive Web App with NextJS!


